
Is your bathroom vanity outdated, damaged, or just not fitting your style anymore? You’re not alone, and the good news is—you don’t have to hire a pro to fix it.
Removing and replacing your bathroom vanity might sound tricky, but with the right steps, you can do it yourself and transform your space quickly. In this guide, you’ll discover easy-to-follow tips that make the whole process clear and manageable. By the end, you’ll have the confidence to tackle this project and give your bathroom the fresh look it deserves.
Ready to get started? Let’s dive in!
Tools And Materials Needed
Removing and replacing a bathroom vanity needs the right tools and materials. Having everything ready makes the job easier and safer.
This guide lists the common tools and materials you will need to complete the task efficiently.
Basic Hand Tools
You will need some basic hand tools to remove the old vanity and install the new one. These tools help you loosen screws and bolts.
- Screwdriver set (flathead and Phillips)
- Adjustable wrench
- Pliers
- Utility knife
- Hammer
Plumbing Tools
Plumbing tools are needed to disconnect and reconnect water supply lines and drain pipes. They ensure no leaks after installation.
- Pipe wrench
- Basin wrench
- Plumber’s tape (Teflon tape)
- Bucket (to catch water)
- Rags or towels
Safety Gear
Wear safety gear to protect yourself while working. It helps prevent injuries and keeps you comfortable.
- Safety glasses
- Work gloves
- Knee pads (optional for comfort)
Materials For Installation
Some new materials may be needed to complete the vanity installation. These items help secure and seal the vanity properly.
- New vanity cabinet
- Caulk (silicone or acrylic)
- Caulk gun
- Wood shims (to level the vanity)
- Mounting screws and anchors

Credit: www.youtube.com
Preparation Steps
Removing and replacing a bathroom vanity needs good preparation. This helps the work go smoothly and safely.
Getting ready before you start saves time and avoids problems during the project.
Shutting Off Water Supply
Turn off the water to stop leaks when you remove the vanity. Find the shut-off valves under the sink or main water line.
Close both hot and cold valves. Open the faucet to drain any water left in the pipes.
- Locate shut-off valves under the sink
- Turn valves clockwise to close
- Open faucet to release water
- Check no water flows before starting
Clearing The Space
Remove items from the vanity top and inside drawers. Move nearby objects to avoid damage.
Clear enough room to work comfortably around the vanity. Protect the floor with a drop cloth or old towels.
- Take out all items from vanity
- Move rugs and furniture away
- Lay down protection on the floor
- Ensure good lighting in the area
Gathering Necessary Tools
Collect all tools before starting. This saves time and makes the job easier.
Common tools include wrenches, screwdrivers, and a utility knife. Have a bucket ready for water spills.
- Adjustable wrench for plumbing
- Phillips and flathead screwdrivers
- Utility knife for caulk removal
- Bucket to catch water
- Pry bar or putty knife for lifting
- Towels or rags for cleanup
Removing The Old Vanity
Removing an old bathroom vanity is a key step before installing a new one. This process requires care to avoid damage to plumbing and walls.
Follow simple steps to safely detach the vanity and prepare the space for replacement.
Detaching Plumbing Connections
Before removing the vanity, turn off the water supply. Then disconnect the plumbing pipes attached to the sink and drain.
- Shut off water valves under the sink.
- Use a wrench to loosen the water supply lines.
- Disconnect the drain trap carefully.
- Place a bucket below to catch any water.
Removing The Vanity Top
The vanity top is often secured with screws or adhesive. Removing it lets you access the cabinet below.
| Method | How to Remove |
| Screws | Locate screws under the vanity top and unscrew them. |
| Adhesive | Use a putty knife to gently pry the top off. |
Unscrewing The Vanity From The Wall
The vanity is usually attached to the wall with screws or brackets. Removing these frees the cabinet for removal.
To remove the vanity from the wall:
- Look inside the cabinet for screws securing it to wall studs.
- Use a drill or screwdriver to remove these screws.
- Carefully pull the vanity away from the wall.
Preparing The Area For The New Vanity
Removing an old bathroom vanity is only the first step. Preparing the space properly helps the new vanity fit well. This part of the process ensures your bathroom looks neat and functions properly.
Take time to inspect and clean the area. This prevents problems later and makes installation easier.
Checking For Wall Damage
Look closely at the walls behind where the vanity was. Check for cracks, holes, or water damage. Walls may need repair before the new vanity goes in.
- Examine drywall for soft spots or mold
- Check for peeling paint or wallpaper
- Look for signs of water leaks or stains
- Repair holes or cracks with spackle or plaster
- Replace damaged drywall if needed
Cleaning The Floor And Walls
Clean surfaces remove dust and grime that block adhesives or cause poor fit. Use proper cleaners for your floor and walls before installing the new vanity.
| Surface | Cleaning Method | Tips |
| Tile Floor | Use warm water and mild detergent | Scrub grout lines gently |
| Vinyl Floor | Use a vinegar and water solution | Avoid harsh chemicals |
| Drywall Walls | Wipe with a damp cloth | Do not soak the surface |
| Painted Walls | Use mild soap and water | Test cleaner on a small spot first |
Installing The New Vanity
Installing a new bathroom vanity improves your space and storage. This guide shows how to install it safely and correctly.
Follow these steps to position, secure, and attach the vanity top for a perfect fit.
Positioning The Vanity
Place the vanity in the desired spot against the wall. Make sure it fits well and lines up with plumbing.
Use a level to check if the vanity stands evenly. Adjust with shims under the base if needed.
Securing The Vanity To The Wall
Find the wall studs behind the vanity using a stud finder. Secure the vanity to these studs for strong support.
- Drill pilot holes through the vanity frame
- Use long screws to attach the vanity to studs
- Check stability by gently shaking the vanity
Do not over-tighten screws to avoid damaging the vanity wood.
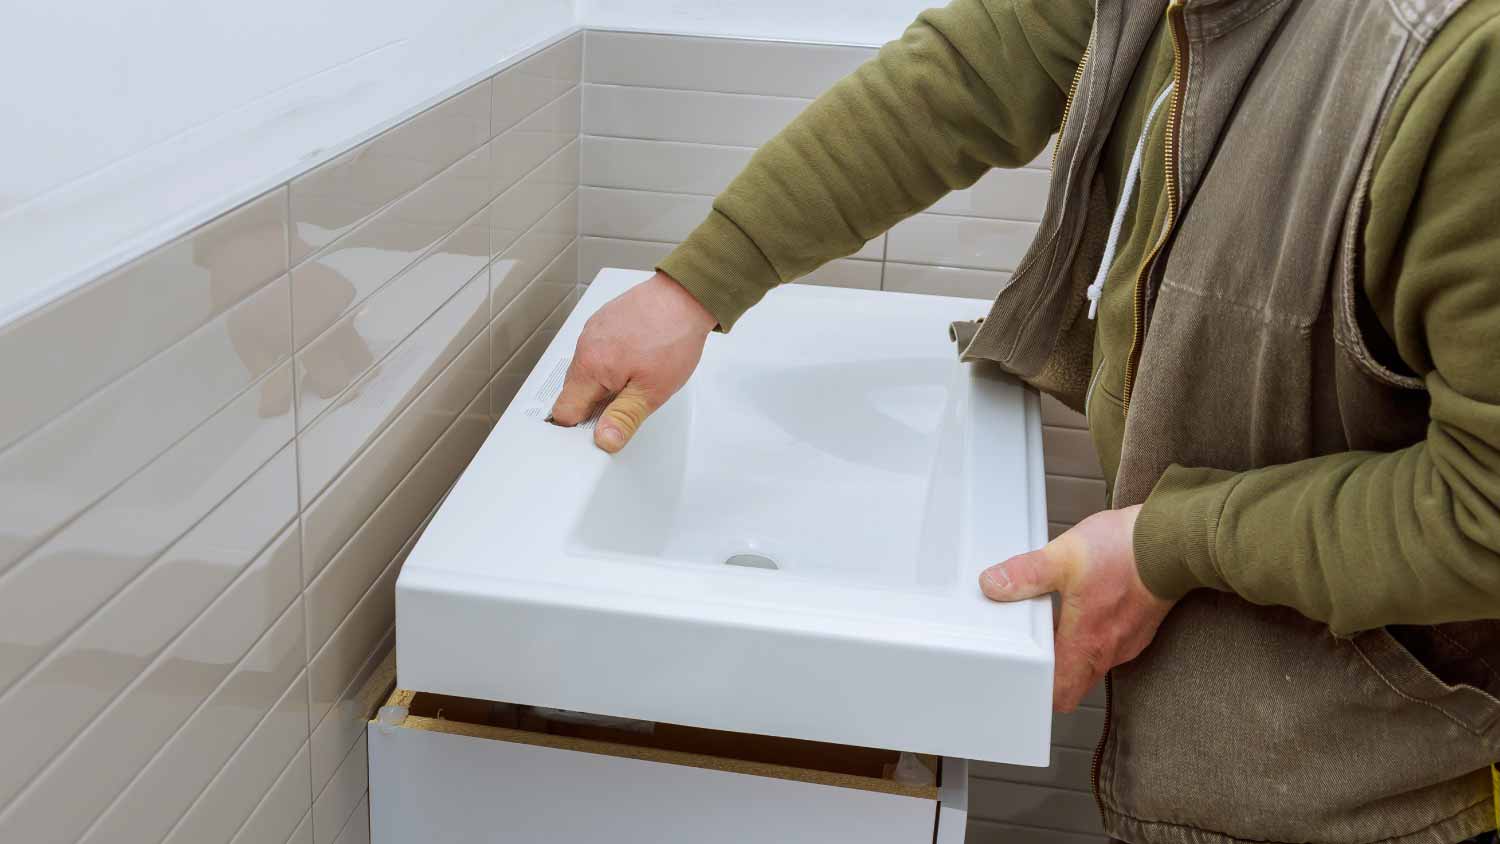
Attaching The Vanity Top
Place the vanity top carefully on the base. Align it so edges match and the sink fits the opening.
Apply a bead of silicone caulk along the top edges of the vanity. This seals the top and prevents water damage.
- Press the vanity top firmly down
- Wipe away excess caulk quickly
- Let the caulk dry for at least 24 hours

Credit: www.familyhandyman.com
Reconnecting Plumbing
After removing and replacing a bathroom vanity, reconnecting the plumbing is key. Proper reconnection ensures your sink works well without leaks.
Follow these steps carefully to install the faucet and drain, connect water supply lines, and check for leaks.
Installing Faucet And Drain
Begin by placing the faucet on the sink and securing it tightly. Attach the drain assembly underneath the basin using plumber’s putty to prevent leaks.
- Apply plumber’s putty around the drain opening.
- Insert the drain flange and tighten the locknut from below.
- Secure the faucet with mounting nuts.
- Connect the drain pipe to the P-trap.
Connecting Water Supply Lines
Attach the hot and cold water supply lines to the faucet’s valves. Use an adjustable wrench to tighten the connections but avoid overtightening.
| Supply Line | Connection Point | Tip |
| Hot Water | Left Valve | Hand-tighten first, then use wrench |
| Cold Water | Right Valve | Check for washers before tightening |
Checking For Leaks
Turn on the water supply and observe all connections. Look carefully under the sink for drips or moisture.
- Inspect faucet base for water
- Check drain connections
- Feel around supply line fittings
- Tighten any loose parts
Finishing Touches
After installing your new bathroom vanity, some final steps will help complete the look. These finishing touches improve the appearance and protect your work.
Focus on applying caulk, painting or touching up walls, and cleaning the area to make your bathroom look fresh and neat.
Applying Caulk
Caulk seals gaps between the vanity and walls or floor. This stops water from leaking and keeps the area clean.
- Choose a waterproof caulk made for bathrooms.
- Cut the tip of the caulk tube at a 45-degree angle.
- Apply a steady bead of caulk along all joints.
- Use a wet finger or a caulk tool to smooth the bead.
- Wipe away excess caulk with a damp cloth quickly.
Painting Or Touching Up Walls
Remove any marks or scratches on the walls from vanity removal or installation. Paint touch-ups make the space look new.
| Task | Tools Needed | Tips |
| Fill holes or cracks | Spackle, putty knife | Let dry fully before painting |
| Sand rough spots | Fine sandpaper | Sand lightly to avoid damage |
| Paint touch-ups | Small brush, matching paint | Use thin coats for even coverage |
| Drying time | Patience | Allow paint to dry completely before use |
Cleaning The Area
Cleaning after the project removes dust, debris, and leftover materials. This makes your bathroom ready for use.
- Remove all tools and unused materials.
- Vacuum dust from floors and corners.
- Wipe surfaces with a damp cloth.
- Clean mirrors and fixtures.
- Dispose of trash properly.
Credit: www.angi.com
Frequently Asked Questions
How Do I Safely Remove A Bathroom Vanity?
Turn off the water supply and disconnect plumbing. Unscrew the vanity from the wall. Carefully detach the countertop and sink. Remove the vanity cabinet without damaging walls or flooring.
What Tools Are Needed To Replace A Bathroom Vanity?
You’ll need a wrench, screwdriver, utility knife, level, drill, and plumber’s tape. Also, gather safety gloves and bucket for water drainage. These tools help ensure a smooth removal and installation process.
How Do I Prepare The Area Before Installing A New Vanity?
Clear the space and clean the wall and floor. Check plumbing and electrical connections for damage. Patch any holes and ensure the wall is level for proper vanity installation.
Can I Install A New Vanity Myself?
Yes, with basic plumbing and carpentry skills, you can install it. Follow manufacturer instructions carefully. If unsure, consider consulting a professional to avoid costly mistakes.
Conclusion
Removing and replacing a bathroom vanity is simple with the right steps. Take your time and follow each step carefully. Measure twice, cut once. Check all connections for leaks after installation. A new vanity can change your bathroom’s look easily.
Enjoy your fresh, clean space. Small projects like this build confidence for bigger ones. Try it yourself and see the difference.