Are you ready to give your bathroom a fresh, stylish look without spending a fortune? Painting your bathroom vanity with chalk paint is one of the easiest and most effective ways to transform your space.
You don’t need to be a professional or have fancy tools to achieve a smooth, beautiful finish. In this guide, you’ll discover simple steps and insider tips that make the process quick and fun. By the end, your vanity will look brand new, and you’ll wonder why you didn’t try this sooner.
Let’s dive in and get your bathroom glowing with a fresh coat of chalk paint!
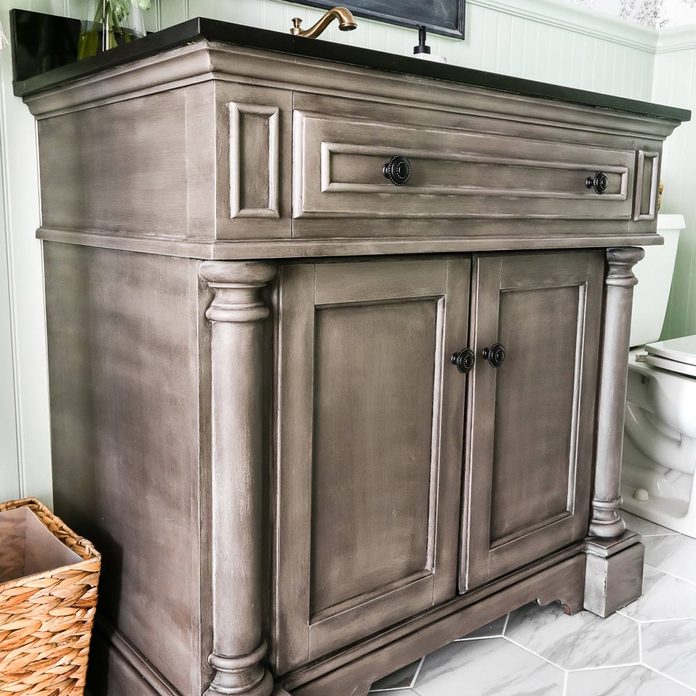
Credit: www.familyhandyman.com
Choosing The Right Chalk Paint
Painting a bathroom vanity with chalk paint can refresh its look. Picking the right paint is key to a smooth project. This guide helps you choose the best chalk paint for your vanity.
Chalk paint comes in many types and colors. You also need to know where to buy good quality paint. Let’s explore these important choices.
Types Of Chalk Paint
There are several kinds of chalk paint. Each type has different features for your project.
- Traditional Chalk Paint:Thick and easy to apply. Needs sealing after drying.
- Pre-Mixed Chalk Paint:Ready to use with smooth texture. Good for beginners.
- Matte Finish Chalk Paint:Gives a flat, non-shiny look. Ideal for vintage styles.
- Outdoor Chalk Paint:Made for moisture resistance. Good for bathroom vanities.
Color Selection Tips
Choosing the right color changes the room’s feel. Pick colors that match your bathroom style.
| Color | Effect |
| White | Makes space look clean and bright |
| Light Blue | Creates a calm and fresh feeling |
| Gray | Adds modern and neutral tones |
| Pastel Green | Brings a soft and natural touch |
| Dark Navy | Offers a bold and stylish look |
Where To Buy Chalk Paint
You can buy chalk paint in many places. Look for stores with good variety and quality.
- Local hardware stores often have popular brands.
- Home improvement centers carry large selections.
- Craft stores sell smaller cans for small projects.
- Online shops offer many brands and colors to choose from.
Credit: cut2size.ca
Preparing The Bathroom Vanity
Before painting a bathroom vanity with chalk paint, proper preparation is key. Taking time to prep helps the paint stick better and last longer.
This guide covers cleaning, sanding, removing hardware, and fixing any damage on your vanity.
Cleaning And Sanding
Start by cleaning the vanity thoroughly. Remove dirt, grease, and grime with a mild cleaner and warm water.
After cleaning, lightly sand the surfaces with fine-grit sandpaper. This roughens the surface so chalk paint will stick well.
- Use a sponge or cloth with warm soapy water
- Rinse and dry completely
- Sand with 120- to 220-grit sandpaper
- Wipe away sanding dust with a clean cloth
Removing Hardware
Take off all knobs, pulls, and handles before painting. This keeps the paint job neat and even.
Use a screwdriver to carefully remove each piece. Store the hardware safely to reattach later.
- Label hardware if needed for easier reassembly
- Keep screws and small parts in a container
- Remove doors and drawers if possible
Repairing Imperfections
Check the vanity for dents, scratches, or holes. Fix these before painting for a smooth finish.
Use wood filler or putty to fill any gaps. Let it dry, then sand the area smooth.
- Apply wood filler with a putty knife
- Allow filler to dry fully (check product instructions)
- Sand repaired spots to blend with the surface
- Clean dust away before painting
Painting Techniques
Painting a bathroom vanity with chalk paint is a simple way to refresh your space. Chalk paint is easy to use and requires minimal prep work.
In this guide, you will learn how to apply chalk paint effectively. We will cover techniques for a smooth finish.
Applying The First Coat
Start by cleaning the vanity to remove dust and grime. Apply the first coat of chalk paint evenly across the surface.
- Stir the chalk paint well before use.
- Use a damp cloth to clean the vanity.
- Apply the paint using smooth, even strokes.
- Allow the first coat to dry completely.
Using A Brush Vs. Roller
Both brushes and rollers can be used for applying chalk paint. Each has its benefits for different surfaces.
| Tool | Benefits |
| Brush | Ideal for detailed areas and corners |
| Roller | Best for large, flat surfaces |
Drying And Curing Times
Proper drying and curing are crucial for a durable finish. Chalk paint dries quickly, but curing takes longer.
- Allow the paint to dry for at least 24 hours.
- Avoid placing items on the vanity until fully cured.
- Consider applying a top coat for extra protection.

Credit: www.prettydistressed.com
Sealing And Protecting The Finish
After painting your bathroom vanity with chalk paint, sealing the surface is important. It protects the paint and keeps the finish looking good.
Choosing the right sealer and applying it carefully will help your vanity last longer and resist water and stains.
Choosing The Right Sealer
Pick a sealer that suits bathroom use. It should resist moisture and wear. You can select wax or polyurethane sealers depending on the look and durability you want.
| Sealer Type | Best For | Durability | Finish |
|---|---|---|---|
| Wax | Low traffic areas, soft matte look | Moderate | Matte, natural |
| Water-based Polyurethane | High moisture, heavy use | High | Clear, non-yellowing |
| Oil-based Polyurethane | Heavy wear, durability | Very high | Warm, amber tint |
Applying Wax Or Polyurethane
Apply the sealer in thin, even coats. Use a clean brush or cloth for wax. For polyurethane, a synthetic brush works well. Let each coat dry fully before adding another.
- Clean the surface before sealing
- Work in a well-ventilated area
- Follow the product instructions carefully
- Lightly sand between coats if needed
- Allow the final coat to cure completely
Maintenance Tips
Keep your vanity looking fresh by cleaning it gently. Avoid harsh chemicals that can damage the sealer. Reapply wax or polyurethane as needed to maintain protection.
- Use a soft cloth for daily cleaning
- Wipe up spills quickly to avoid damage
- Reapply wax every 6 months if used
- Inspect for chips or wear regularly
- Touch up with sealer to protect exposed paint
Reinstalling Hardware And Final Touches
After painting your bathroom vanity with chalk paint, reinstalling the hardware is the last big step. It helps bring your project together and gives the vanity a fresh look.
Pay close attention to how you select and attach the new hardware. Adding small decorative touches can also make a big difference in the final appearance.
Selecting New Hardware
Choose hardware that fits the style of your bathroom and vanity. New knobs or handles can update the look quickly and easily.
- Pick materials like brass, chrome, or brushed nickel
- Match the finish with other bathroom fixtures
- Consider the size to fit your vanity drawers and doors
- Choose a style that complements your paint color and design
Proper Reattachment
Before putting hardware back, check the screws and holes. Fix any damage to ensure a secure hold.
| Hardware Part | Check For | Tip |
| Knobs | Thread damage | Replace screws if stripped |
| Handles | Alignment | Measure spacing before drilling |
| Screws | Rust or wear | Use new screws for better grip |
Use a screwdriver or drill carefully to avoid cracking the paint. Tighten screws just enough to hold hardware firmly.
Adding Decorative Accents
Small decorative touches can boost your vanity’s charm. Think about adding liners, decals, or protective wax.
- Drawer liners with fun patterns
- Vintage or floral decals on flat surfaces
- Clear wax to protect chalk paint finish
- Small stencils to add subtle designs
Common Mistakes To Avoid
Painting a bathroom vanity with chalk paint can change its look. Avoid mistakes that can hurt your project.
Knowing what to avoid helps you get a smooth, lasting finish on your vanity.
Skipping Surface Prep
Not cleaning or sanding the vanity first is a big mistake. Dirt and grease stop paint from sticking well.
Always wipe the surface clean and sand it lightly. This helps paint grab and last longer.
- Remove all dust and dirt
- Lightly sand to create a rough surface
- Use a damp cloth to remove sanding dust
Applying Thick Paint Layers
Painting thick layers can cause drips and uneven texture. Thick paint takes longer to dry and may peel.
Use thin, even coats instead. Let each coat dry before adding the next one.
- Use a good brush or roller for even coverage
- Apply multiple thin coats
- Check for drips and smooth them out
Ignoring Drying Times
Not waiting long enough between coats can ruin the finish. Paint may peel or look sticky if rushed.
Follow the recommended drying times on the paint label. Patience gives a strong, smooth finish.
- Check the paint can for drying time details
- Wait at least a few hours between coats
- Let the final coat dry fully before use
Frequently Asked Questions
How Do I Prepare A Bathroom Vanity For Chalk Paint?
Start by cleaning the vanity thoroughly. Remove dirt, grease, and old wax. Lightly sand the surface for better paint adhesion. Wipe off dust before painting.
Can I Use Chalk Paint Without Primer On Vanity?
Yes, chalk paint usually doesn’t require primer. However, priming helps with durability and smooth finish, especially on glossy surfaces.
How Many Coats Of Chalk Paint Are Needed?
Typically, apply two to three coats for full coverage. Let each coat dry completely before applying the next.
Should I Seal Chalk Paint On A Bathroom Vanity?
Yes, sealing is essential. Use a clear wax or water-based polyurethane to protect against moisture and daily wear.
Conclusion
Painting a bathroom vanity with chalk paint is simple and fun. You only need a few supplies and some patience. The paint dries quickly and gives a smooth, matte finish. You can choose any color to match your style. Remember to clean and sand the surface before painting.
A coat of wax or sealer will protect your work. Small steps make a big difference in your bathroom’s look. Try this project to refresh your space without spending much money. Enjoy your new, beautiful vanity every day.