Are you ready to transform your space quickly and easily? Hanging wall panels can give your room a fresh, stylish look without the hassle of major renovations.
But if you’ve never done it before, the process might seem tricky or overwhelming. Don’t worry—this guide will walk you through every step, making it simple for you to get professional-looking results. By the end, you’ll have the confidence and know-how to hang your wall panels like a pro.
Keep reading, and let’s get started on upgrading your walls today!

Credit: www.bathrooms.com
Choosing The Right Wall Panels
Wall panels can change the look of a room quickly. Picking the right panels is important for style and function.
Think about the room’s use and your budget before buying panels. This guide helps you choose the best wall panels.
Types Of Wall Panels
There are several types of wall panels to fit different needs and styles. Some are easy to install, while others need more work.
- Wood panels add warmth and natural beauty.
- MDF panels are smooth and good for painting.
- PVC panels resist moisture, good for bathrooms.
- Fabric panels improve sound and add texture.
- Metal panels give a modern, industrial look.
Material Considerations
| Material | Durability | Maintenance | Best Use |
| Wood | High | Needs polishing | Living rooms, offices |
| MDF | Medium | Easy to clean | Bedrooms, painted walls |
| PVC | High | Wipe with cloth | Bathrooms, kitchens |
| Fabric | Low | Vacuum often | Home theaters, lounges |
| Metal | Very high | Wipe and polish | Commercial spaces |
Color And Design Choices
Color and design affect the room’s mood and style. Choose panels that match your decor and lighting.
- Light colors make rooms feel bigger and brighter.
- Dark colors add warmth and a cozy feel.
- Patterns can create a feature wall or add interest.
- Glossy finishes reflect light for a modern look.
- Matte finishes hide wall flaws better.
Gathering Essential Tools
Before you hang wall panels, you need the right tools. This helps the job go smoothly and safely.
Having all tools ready saves time and prevents mistakes. Let’s look at what you need.
Tools Required
These are the main tools you will use to hang wall panels accurately and securely.
- Measuring tape to get exact panel size and placement
- Level to ensure panels are straight
- Drill with drill bits for making holes
- Screwdriver or power driver for screws
- Hammer for nails or tapping panels into place
- Stud finder to locate wall studs for secure mounting
- Utility knife to trim panels if needed
Safety Equipment
Safety is important. Use protective gear to avoid injuries while working on walls.
| Safety Item | Purpose |
| Safety goggles | Protect eyes from dust and debris |
| Work gloves | Prevent cuts and splinters on hands |
| Dust mask | Keep dust from entering your lungs |
| Ear protection | Reduce noise from power tools |
| Closed-toe shoes | Protect feet from falling tools or panels |
Preparing The Wall Surface
Before hanging wall panels, prepare the wall surface well. A clean and smooth wall helps the panels stick better.
Proper preparation also makes the wall look good after installation and helps the panels last longer.
Cleaning The Wall
Remove dust, dirt, and grease from the wall. Use a damp cloth or sponge with mild soap.
- Wipe the entire wall surface thoroughly
- Focus on corners and edges where dust gathers
- Let the wall dry completely before moving on
Repairing Imperfections
Fill holes, cracks, and dents to create a smooth surface. Use spackling paste or wall filler.
| Imperfection | Repair Method |
| Small holes | Fill with spackling paste and sand smooth |
| Cracks | Apply filler and smooth with putty knife |
| Dents | Use wall filler and sand when dry |
Measuring And Marking
Measuring and marking are key steps before hanging wall panels. Accurate measurements help the panels fit well and look neat.
Marking your wall clearly guides where each panel should go. This prevents mistakes and saves time.
Accurate Measurements
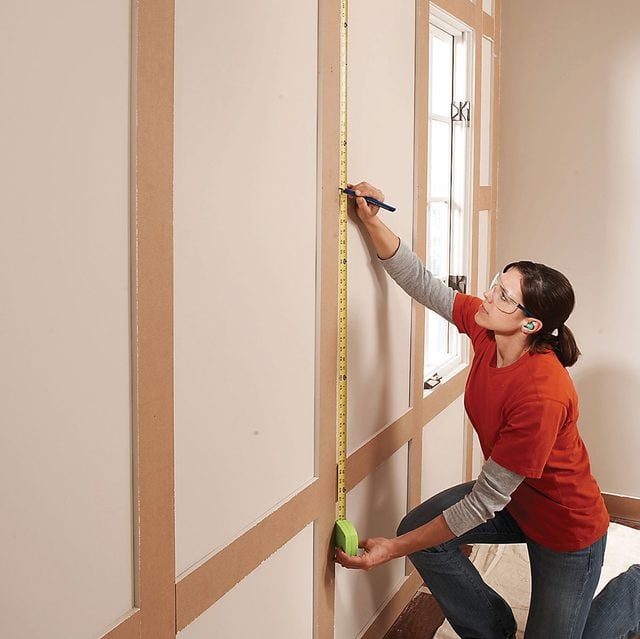
Start by measuring the wall width and height carefully. Use a tape measure that is easy to read and long enough to cover the entire space.
- Measure the wall from corner to corner at the top, middle, and bottom.
- Write down all measurements to compare and find the average.
- Measure the panel size to know how many panels you need.
- Allow a small gap for expansion if recommended by the panel manufacturer.
Marking Guidelines
Mark your wall with a pencil where each panel edge will sit. Use a level tool to make sure your marks are straight and even.
| Tool | Purpose |
| Pencil | Make light, removable marks |
| Level | Ensure marks are straight |
| Tape Measure | Check distances accurately |
| Square | Mark right angles |
Installing Wall Panels
Wall panels can change the look of any room. They are easy to install with some tools and care.
This guide will help you install wall panels smoothly and securely on your walls.
Starting The Installation
Begin by cleaning the wall surface. Make sure it is dry and free of dust or grease.
Measure the wall area where you want to place the panels. Mark guidelines with a pencil for accuracy.
- Clean the wall thoroughly
- Check for any damages or holes
- Use a level to draw straight lines
- Gather all your tools and panels
Aligning Panels
Place the first panel at the bottom corner of the wall. Align it with your guidelines and the floor.
Make sure the panel edges fit tightly with no gaps. Adjust panels as needed for a smooth look.
- Start from a corner or a straight edge
- Check alignment using a level
- Fit panels tightly together
- Trim panels if they don’t fit properly
Securing Panels
Attach panels to the wall using nails, screws, or adhesive. Choose the method based on panel type and wall material.
Ensure panels are firmly fixed to avoid movement or damage over time.
- Use a nail gun or hammer for wooden panels
- Apply strong adhesive for lightweight panels
- Secure edges and corners well
- Check each panel after securing
Credit: woodenwoodworks.com
Finishing Touches
Finishing touches make your wall panels look neat and complete. These steps help hide rough edges and gaps.
Proper trimming, edging, and sealing give a polished appearance. They also protect the panels from damage.
Trimming And Edging
Trim excess panel material with a sharp utility knife for clean lines. Use straight edges or guides to cut evenly.
Apply edging strips or molding to cover cut edges. This adds style and prevents chipping or peeling.
- Use wood or plastic trim that matches your panel style
- Attach trim with small nails or adhesive
- Sand edges lightly for smoothness before trimming
- Paint or stain trim to blend with wall panels
Sealing Gaps
Fill gaps between panels and walls with caulk or sealant. This prevents dust and moisture from getting inside.
Use a flexible sealant that matches your panel color for a seamless look. Smooth the sealant with a wet finger or tool.
- Choose paintable caulk for easy touch-ups
- Apply sealant evenly along all edges
- Allow sealant to dry fully before painting or decorating
- Check for gaps regularly and reseal if needed
Maintaining Wall Panels
Keeping your wall panels clean and in good shape helps them last longer. Regular care stops damage and keeps them looking fresh.
Simple maintenance makes your room look neat and protects your walls from wear and tear.
Cleaning Tips
Dust your wall panels often with a soft cloth. This stops dirt from building up on the surface.
For stains, use a mild soap mixed with water. Gently wipe the panels without soaking them.
- Avoid harsh chemicals that can damage the panel finish
- Use a microfiber cloth to prevent scratches
- Dry panels after cleaning to stop water marks
Repairing Damage
Small scratches and dents can be fixed with wood filler or putty. Match the color to your panels.
Replace any loose or broken panels to keep the wall strong and even.
- Clean the area before applying filler
- Sand the filler smooth after it dries
- Use panel adhesive for loose pieces
- Call a professional for large damage
Credit: www.familyhandyman.com
Frequently Asked Questions
How Do You Prepare Walls For Hanging Panels?
Clean and smooth the wall surface before installation. Remove nails, dust, and bumps. Use a level to mark panel placement for precise alignment.
What Tools Are Needed To Hang Wall Panels?
You’ll need a tape measure, level, stud finder, drill, screws, and adhesive. These tools ensure secure and accurate panel installation on your walls.
Can Wall Panels Be Installed On Uneven Surfaces?
Yes, but uneven surfaces require additional preparation. Use shims or a backer board to create a flat base. This prevents panel warping and ensures a clean finish.
How Do You Align Wall Panels Evenly?
Use a level and measuring tape to mark guidelines on the wall. Start hanging from the center or a corner, ensuring each panel matches the markings.
Conclusion
Hanging wall panels can change a room’s look quickly. Choose the right tools and measure carefully first. Take your time to align each panel well. Secure panels firmly to avoid any future problems. Clean up the area once done for a neat finish.
Enjoy the new style and feel of your space. Small steps lead to great results in home projects. Keep practicing to improve your skills with each try.